An Introduction To LilyPond
To install it on Debian GNU/Linux, the terminal command is:
sudo apt-get install lilypond fluidsynth
You can also use su to login as root.
This installs LilyPond, the music engraving software, and FluidSynth, which we will be using to create a WAV file of the score.
It seems LilyPond is not available on Debian Stretch at the moment, so you have to download it here. Once installed, you can run LilyPond in the terminal by entering:
~/lilypond/usr/bin/lilypond
For this demonstration, I will use an excerpt from Short And Sweet, a solo piano piece. Now let's open up our text editor and get started!
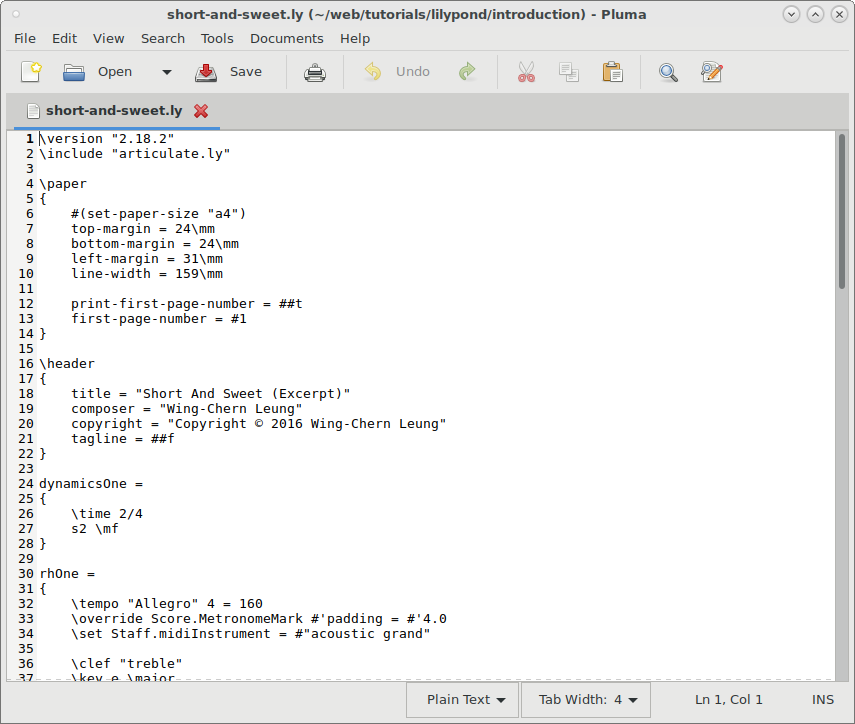
First you need to enter your version of LilyPond with the \version command. To check what version of LilyPond you have installed, enter lilypond into the terminal. \include "articulate.ly" is used to make the MIDI file we generate more realistic.
The \paper block is used to specify the page layout. First we set the page size to A4. Then we define the margins. It seems there is not an option to define the right margin, but you can set the left margin and line width. I like the first page to have a page number, so I set that variable to ##t. You can also choose what the first page number is, which is useful if you are making a book of sheet music.
Next is the \header block. We can set many fields in the header, including the title of the score, the composer, and the copyright (the copyright symbol, ©, is entered with Shift + Right Alt + C on my computer). We can remove the "Music engraving by LilyPond" tagline with tagline = ##f.
Now onto the music! First the dynamics (I named it dynamicsOne), \time 2/4 sets the time signature to 2/4. s2 \mf sets the dynamics of the first bar to mezzo-forte. As this piece stays at mezzo-forte throughout, we don't need to enter any more dynamics. You can enter more dynamics in your own music by using s and the new dynamics. For example:
s2 \mf s s s
s \f s s s
\time 3/4 s2. \p s s s

Now for the right hand (I named it rhOne); first the \tempo command. We can set the text to "Allegro", and the tempo to 160bpm with 4 = 160. \override Score.MetronomeMark #'padding = #'4.0 raises the metronome marking up from its default (I think it looks a little bit better). \set Staff.midiInstrument = #"acoustic grand" sets the MIDI sound to "acoustic grand". Then we enter the treble clef, the key signature, and the time signature. If your piece is in 4/4 the default time signature marking is "C". To have it display 4/4, add \numericTimeSignature above the \time 4/4 command and it will show 4/4 numerically.
Single line comments start with %. Rests are entered with r then the duration, for example 4 for a quarter note, 8 for an 8th note etc. The duration of the note or rest persists until a new value is entered. Chords are entered between the angled brackets < and >. For a sharp note, enter is after the note. Flat notes are entered with es. Double sharp is entered with isis and double flat is entered with eses. Ties are made with ~. Staccato notes are entered with \staccato after the note.
As for the actual notes, you can use absolute octave entry or relative octave entry (I prefer absolute octave entry).

Now for the left hand (I named it lhOne). We can set the MIDI instrument again. We can set the clef to "bass". Like with the right hand, we can set the key signature and the time signature. \bar "|." enters a closing double bar line. For other bar lines, click here.
That's enough for the music, but now we need to enter some more commands to generate a score and MIDI file. First the score (I named it music). We enter a new piano staff with \new PianoStaff. We can enter the name "Piano" and the abbreviation "Pno." in the \with block. We can then put the notes in rhOne and lhOne, and the dynamics in dynamicsOne, into the staff:

The MIDI file can be generated with \new PianoStaff aswell (I named it musicMidi), but we need to enter the dynamics for both the right hand and the left hand:

Now for the \score commands. The first creates a score with the commands entered in "music". The second creates a MIDI file using the commands entered in "musicMidi" and plays the repeats and uses articulation:

Now open up the terminal emulator and change directory to where you saved the LilyPond file. Using a file name of short-and-sweet.ly, enter:
lilypond -d no-point-and-click short-and-sweet.ly && fluidsynth -F short-and-sweet.wav /usr/share/sounds/sf2/FluidR3_GM.sf2 short-and-sweet.midi
If you have compiled LilyPond yourself, then the command is to run LilyPond stored in your home folder:
~/lilypond/usr/bin/lilypond -d no-point-and-click short-and-sweet.ly && fluidsynth -F short-and-sweet.wav /usr/share/sounds/sf2/FluidR3_GM.sf2 short-and-sweet.midi
-d no-point-and-click disables the point and click functionality. short-and-sweet.ly is our input file. The && operator executes the next command only if the previous one succeeded. fluidsynth is used to create a WAV file from the MIDI file. -F short-and-sweet.wav names the output file "short-and-sweet.wav". /usr/share/sounds/sf2/FluidR3_GM.sf2 is the path to the SF2 samples we are using. short-and-sweet.midi is our input file.
You should now have a PDF file of the score, and a WAV file of the music! If you are curious to hear what "Short And Sweet" sounds like, click here.